Products
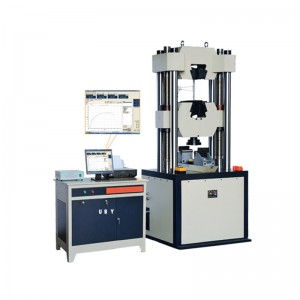
UP-2009 PC Electro-Hydraulic Servo Universal Testing Machine
Host
The host is equipped with a cylinder under the host, the drawing space is located above the mainframe, and the compression and bending test space is located between the main beam and the table.
Transmission system
The lower beam lifting motor by the reducer, chain drive mechanism, ball screw drive, to achieve stretching, compression space adjustment.
Hydraulic system
The hydraulic fluid in the fuel tank is driven by the high-pressure pump into the oil passage through the motor, flows through the check valve, the high pressure oil filter, the pressure difference valve group, the servo valve, enters the cylinder (replace the conventional machine with the gap seal, thus does not realize the oil leakage phenomenon) The The computer sends out the control signal to the servo valve, controls the opening and the direction of the servo valve, thus controls the flow into the cylinder, realizes the constant speed test force, the constant velocity displacement and so on the control.
Control System
Introduction to features
1,support for stretching, compression, cutting, bending and other tests;
2,support open editing test, edit the standard and edit steps, and support export test, standards and procedures;
3,Support for test parameter customization;
4,use open EXCEL report form, support user custom report format;
5,query print test results flexible and convenient to support the printing of multiple samples, custom sorting print items;
6, Program comes with powerful test analysis function;
7,program support hierarchical management level (administrator, pilot) user management authority;
Software Description
1,The main interface set is multi-function, the main interface of the program includes: system menu area, tool area, display panel, speed display panel, test parameter area, test process area, multi-curve curve area, result processing area, test information Area.
2, Curve rendering: The software system provides a rich test curve display. Such as force - displacement curve, force - deformation curve, stress - displacement curve, stress - deformation curve, force - time curve, deformation - time curve.
3, Data processing analysis interface: according to user requirements automatically obtained, ReH, ReL, Fm, Rp0.2, Rt0.5, Rm, E and other test results.
4, Test report interface: the software operating system provides a powerful report processing functions, customers can print their own needs according to their needs test report. Test data can be stored, printed, and analyzed.
5,Safety protection device
When the test force exceeds 3% of the maximum test force, overload protection, pump motor shutdown.
When the piston rises to the upper limit position, the stroke protection, the pump motor stops.
Main Specifications
A) Style: Microcomputer control, double column type
B) Maximum test force: 300KN;
C) the minimum resolution of the test force: 0.01N;
D) Accurate measurement range: 4%-100%FS
E) accuracy of test force; better than ± 1%
F) Displacement resolution: 0.01mm;
G) Displacement measurement accuracy: 0.01
H) Stretch travel: 600mm
I) Compression stroke: 600mm
J) Piston stroke: 150min
K) Displacement speed control accuracy: ± 1% (common)
L) Tester level: 1 (ordinary) /0.5 level
M) Round specimen jaws hold the diameter: Φ6-Φ26mm
N) Flat specimen jaws hold the thickness: 0-15mm
O) Tester size: 450 * 660 * 2520mm
P) Maximum flat specimen clamping width: φ160mm
Q) Pressure plate size : φ160mm
R) Bending test Maximum distance between two points: 450 mm
S)Bending roll width:120mm
T) Bend rolling diameter:Φ30 mm
H)Maximum piston movement speed: 50mm / min
I)clamping method hydraulic clamping
J)Mainframe dimensions :720 × 580 × 1950 mm
k)Gauge cabinet size: 1000×700×1400mm
l) Power supply: 220V, 50Hz
m) Tester weight: 2100kg


